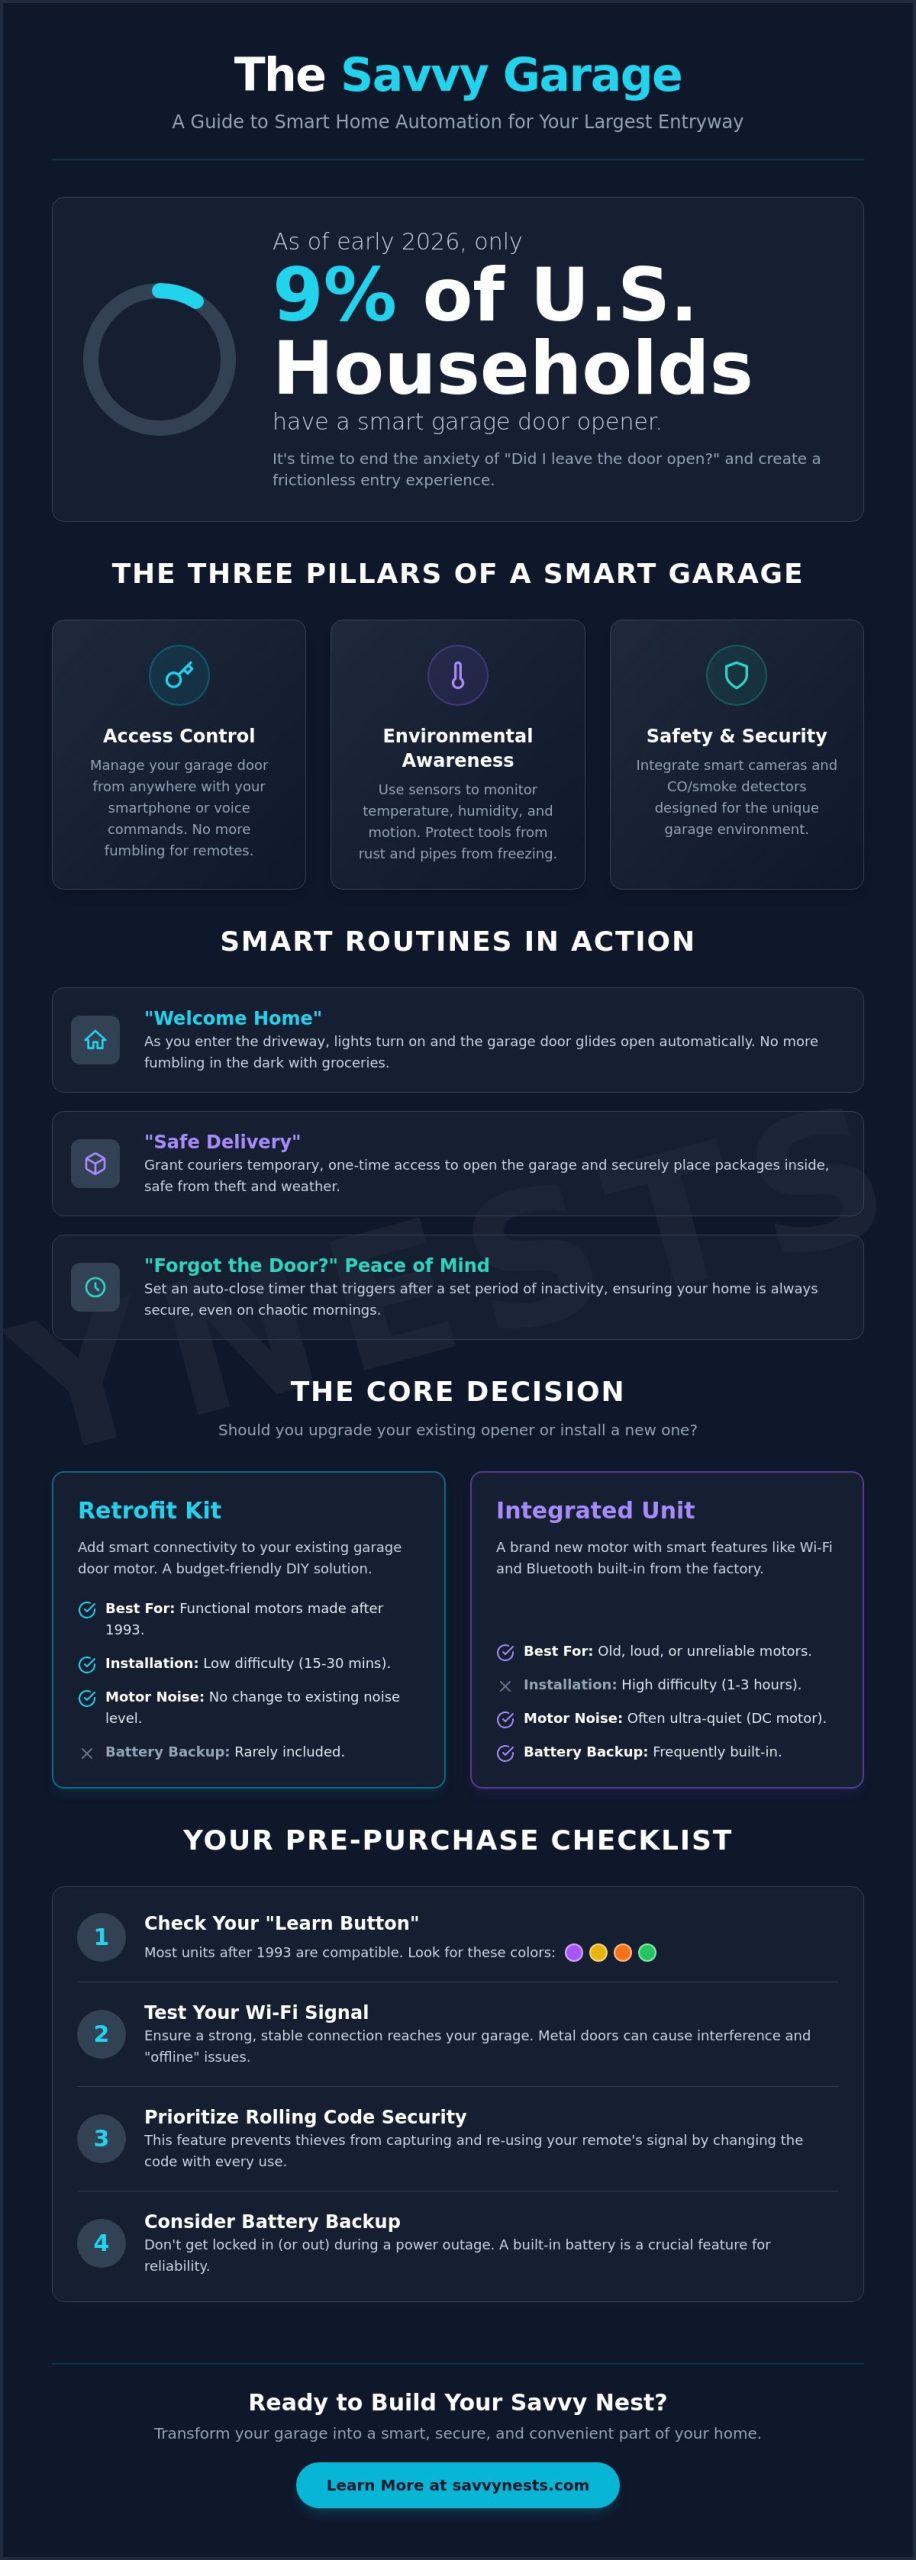
Did you know that as of early 2026, only about 9% of U.S. households have invested in a smart garage door opener? While the rest of the home gets smarter, the garage is often left in the dark, literally and figuratively. If you’ve ever spent your morning commute gripped by anxiety over whether you actually closed the door, you’re not alone. Mastering garage smart home automation isn’t just about high-tech gadgets; it’s about creating a frictionless entry experience that simplifies your daily life.
It’s incredibly frustrating to fumble for light switches with your hands full or deal with a spotty Wi-Fi signal that drops exactly when you need it. You deserve a home that anticipates your needs. This guide will help you transform your garage from a cluttered storage space into a secure, automated hub using the latest savvy tech. We’ll walk you through the best retrofit controllers, explain how to ensure a seamless connection, and share the smart routines that offer true peace of mind.
Key Takeaways
- Learn how to decide between retrofitting your current motor with a smart controller or upgrading to a fully integrated unit.
- Discover how to expand your setup beyond the door with motion-activated lighting and climate control routines.
- Master the essential first steps of garage smart home automation by testing signal strength and bypassing common connectivity hurdles.
- Find out how to solve the “offline” problem and protect your smart devices from interference caused by metal garage doors.
- Understand the mechanical requirements and safety guidelines needed to ensure your automated hub is both secure and reliable.
What is Garage Smart Home Automation?
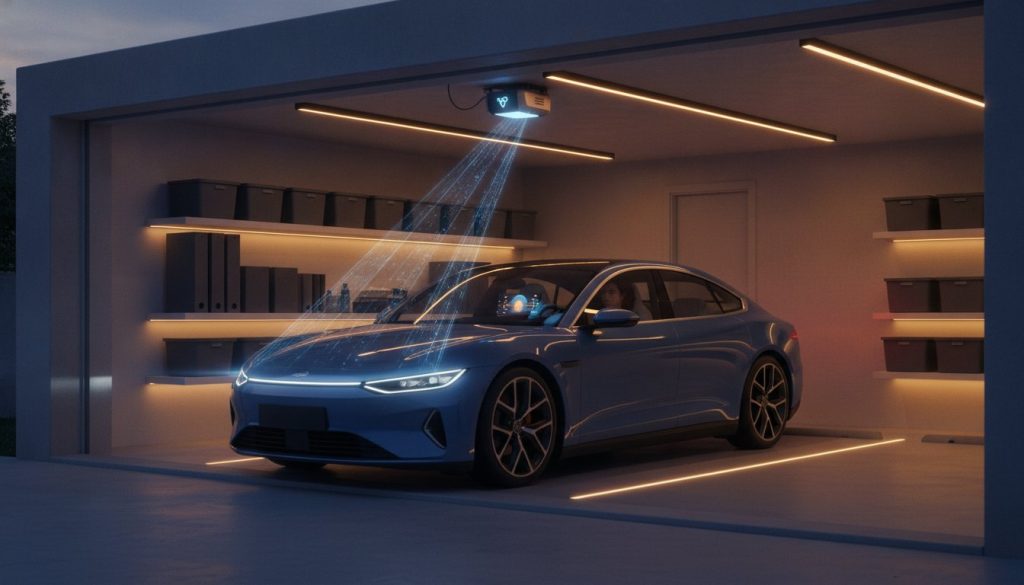
Think of garage smart home automation as the brain transplant your home’s largest entry point has been waiting for. At its most basic level, it’s the use of connected devices to monitor, secure, and control your garage functions, from the heavy door itself to the lights and even the climate. It moves your space beyond the simple mechanical remote, which hasn’t changed much since the 1980s, and into a world of intelligent, sensor-based routines.
This “savvy” shift is about removing friction from your daily life. Instead of wondering if you remembered to close the door while you’re sitting at your desk five miles away, your home simply tells you. It’s about a space that reacts to your presence. The core benefits go far beyond convenience; you’re looking at enhanced security, better protection for delivered packages, and improved energy efficiency. By 2026, the rise of Matter-compatible devices has made this setup easier than ever. Matter acts as a universal language, ensuring that your new garage tech will play nicely with your existing smart home hub without the usual setup headaches.
The Three Pillars of a Smart Garage
To build a truly automated space, you need to focus on three specific areas. First is Access Control. This is the ability to manage your door and entry points via your smartphone or voice commands. Second is Environmental Awareness. This involves using sensors to monitor temperature, moisture, and motion, ensuring your tools don’t rust and your pipes don’t freeze. Finally, there’s Safety and Security. This pillar integrates cameras and smoke or carbon monoxide detectors that are specifically designed to handle the unique environment of a garage.
How Garage Automation Fits Your Lifestyle
The real magic of garage smart home automation happens when these devices work together to support your routine. Imagine a “Welcome Home” routine where the garage lights flicker on and the door glides open the moment your car enters the driveway. It eliminates fumbling for switches in the dark with a handful of groceries.
For those who shop online, the “Safe Delivery” solution is a game changer. You can grant a courier temporary access to drop off a package inside the garage, keeping it safe from “porch pirates” and bad weather. Perhaps most importantly, you get the “Forgot the Door” peace of mind. You can set auto-close features that trigger after five minutes of inactivity, ensuring your home stays secure even during the most chaotic Monday mornings.
Choosing Your Smart Garage Door Opener
The first hurdle in your journey toward garage smart home automation is deciding how much hardware you actually want to touch. Many homeowners assume they need to replace their entire motor to get “smart” features, but that’s a common misconception. If your current motor is running smoothly, a retrofit kit offers a budget-friendly way to add connectivity without the heavy lifting of a full replacement. However, if your opener is loud, jerky, or nearing its ten-year mark, a brand-new integrated unit might be the savvy choice for long-term reliability.
Before you buy, check the “learn button” on your existing motor. Most retrofit kits are compatible with units manufactured after 1993, specifically those with yellow, purple, orange, or green learn buttons. These colors indicate the frequency and security protocol the motor uses. If you see a purple button, you’re usually in the clear for most modern add-ons. Security is paramount here. Look for devices that utilize rolling code technology. This prevents “code grabbing,” where a tech-savvy thief intercepts your remote’s signal to mirror it later. Instead, the access code changes every single time you use the door.
Retrofit Kits vs. Integrated Smart Openers
Retrofit kits like the Meross MSG200HK are designed for the DIY enthusiast. They’re inexpensive and usually take less than 30 minutes to install. On the other hand, integrated units like the Genie StealthDrive Connect come with Wi-Fi built directly into the chassis. These units often feature DC motors, which are significantly quieter than the old AC motors found in basic models. If you’re unsure which path fits your budget, checking out your smart home buying guide can help you weigh the pros and cons of each brand’s ecosystem.
| Feature | Retrofit Kit | Integrated Unit |
|---|---|---|
| Installation Difficulty | Low (15-30 mins) | High (1-3 hours) |
| Motor Noise | No change | Often ultra-quiet |
| Battery Backup | Rarely included | Frequently built-in |
| Smart Connectivity | Add-on module | Native Wi-Fi/Bluetooth |
Key Features to Look For
Don’t overlook the importance of a battery backup. If the power goes out during a storm, an opener with a backup battery ensures you aren’t stuck manually hauling the door open in the rain. Another “must-have” is the auto-close timer. You can set your door to automatically shut after five or ten minutes of being left open. This simple automation eliminates that nagging “did I close the door?” anxiety. If you want to dive deeper into specific device performance, you can browse our latest smart device reviews to see how these features hold up in real-world testing. Finally, consider geofencing. This technology uses your phone’s GPS to detect when you’re turning onto your street, signaling the door to open so you can drive right in without touching a button.
Essential Garage Automation Ideas Beyond the Door
While the door is the center of your garage smart home automation journey, it’s really just the starting line. A truly savvy space works for you in ways you might not even notice until they’re gone. Think about the last time you carried a heavy box through the side door only to realize the light switch was on the far wall. Or consider the expensive tools sitting in a humid corner, slowly gathering rust. By expanding your automation beyond the opener, you create a room that protects your investments and your safety.
Smart Lighting for Safety and Style
Lighting is the easiest way to feel the immediate impact of automation. Motion-activated smart bulbs or sensors ensure that the moment the garage door begins to rise, or you step through the interior door, the space is flooded with light. You can even install smart LED strips along the floor to create pathway lighting. This provides a clear visual guide for night parking without blinding you with overhead glare. For an extra layer of security, try linking your smart lights to the door status. You can program a specific bulb near your kitchen entry to glow red if the garage door is still open after 9:00 PM.
Garage Climate and Air Quality
Many people treat the garage as a dead zone for climate control, but that’s a mistake if you store vehicles, electronics, or expensive gear there. Smart humidity sensors are essential for preventing rust on your tools and classic cars. You can set up an automation where a smart fan triggers the moment the garage reaches a specific temperature or humidity level. It keeps the air moving and the space usable year-round. Safety is also a priority. Integrating a smart carbon monoxide monitor with your main home security system is vital. If a car is left idling or a gas heater malfunctions, you’ll get an immediate alert on your phone, even if you’re inside the main house.
Finally, don’t forget about your power management. Smart plugs are perfect for heavy machinery like shop vacs, soldering irons, or portable space heaters. You can create a “Workday Over” routine that automatically cuts power to these plugs at a certain time each evening. This ensures you never accidentally leave a fire hazard running overnight. It’s these small, thoughtful integrations that turn a basic storage area into a high-performance hub that actually looks out for you.
How to Set Up Your First Garage Automations
Transitioning from a traditional setup to garage smart home automation is a rewarding DIY project that you can likely tackle in a single afternoon. The key to a successful installation isn’t just about following the manual; it’s about preparing your environment first. Before you unbox any hardware, take your smartphone to the garage and stand right next to your existing door motor. Check your Wi-Fi signal strength. Most smart garage devices rely on a 2.4GHz connection, and because garages are often surrounded by thick concrete or metal, they’re notorious for dead zones. If your signal is weak, you’ll want to install a Wi-Fi extender before proceeding.
Once you’ve confirmed a solid connection, you can install your hardware. Whether you’re mounting a retrofit sensor or a full integrated opener, always follow the manufacturer’s specific mounting instructions to ensure the device has a clear line of sight to the door. After the physical install, link the device to your primary smart home hub. This is where the magic happens, as it allows your garage door to talk to your lights, cameras, and security system. If you’re looking for more inspiration on which devices to choose before you start wiring, check out our smart device reviews for the latest top-rated gear.
The final step in your initial setup is testing. Open and close the door several times using the app to ensure everything is smooth. Most importantly, verify that your physical safety sensors (the photo-eyes near the floor) still work perfectly. Federal safety standard 16 CFR Part 1211 requires these sensors to trigger an automatic reversal if anything blocks the beam. Your smart features should never override these critical physical safety measures.
Creating Your First Savvy Routines
The real value of an automated space is found in the routines you build. Start with a “Goodnight” routine that automatically checks the door status at 10:00 PM and closes it if it was left open. You can also set up a “Package Delivery” routine. This allows you to generate a temporary guest code for your keypad, giving a courier one-time access to leave a box inside. If you find these automations helpful, you can how to create smart home routines for the rest of your house to build a truly cohesive environment.
Safety Precautions During Installation
You must unplug the garage door opener from its power source before performing any wiring work to prevent accidental activation or electrical shock. Once your installation is complete, pull the manual release cord to verify it’s still accessible and functions correctly in case of a power failure. Finally, check the alignment of your obstruction sensors. These should be mounted no higher than six inches off the ground to ensure they properly detect children or pets that might be in the door’s path.
Troubleshooting and Connectivity Solutions
Even the most advanced garage smart home automation system can hit a snag. The most common headache for homeowners is the dreaded “Offline” status appearing in their app. Garages are notoriously difficult for Wi-Fi signals because they’re often built with thick concrete walls or heavy metal doors that act like a shield. If your door won’t respond, it’s usually not a hardware failure but a connectivity gap. You might also face ecosystem conflicts where your door opener simply refuses to acknowledge your smart hub. When this happens, a simple power cycle or checking for a firmware update usually clears the digital cobwebs.
Don’t forget that a smart door still needs old-fashioned care. A high-tech motor can’t compensate for a rusty track or a dry chain. If you hear grinding or see the door straining, it’s time for a “dumb” lube job. Use a high-quality silicone-based garage door lubricant on the rollers, hinges, and springs. This reduces the physical load on your smart motor, preventing it from overheating or triggering a false “obstruction” alert because the door is too heavy to move smoothly. A well-maintained door ensures your automation hardware lasts for years rather than months.
Boosting Your Garage Wi-Fi
If your router is in the living room and your garage is at the end of a long hallway, you’ll likely need a signal boost. Powerline adapters are a savvy solution that uses your home’s existing electrical wiring to send data directly to a garage outlet. For detached garages, an outdoor-rated Wi-Fi extender can bridge the gap through the air. If you’re already using a mesh system, simply placing an additional mesh node near the garage entry ensures a seamless handoff as you arrive home, keeping your garage smart home automation responsive and reliable.
Smart Garage Security Best Practices
Connectivity is important, but security is vital. Always enable Two-Factor Authentication (2FA) on any app that controls your home’s entry points. It’s a small step that provides a massive layer of protection against unauthorized access. You should also be careful with voice assistants. Disable the “Voice Open” command unless it requires a specific PIN. This prevents someone from simply shouting “Open the garage” through your front door or a window to gain access. Finally, make it a habit to check for firmware updates once a month. Manufacturers regularly release patches to fix security vulnerabilities, ensuring your savvy space remains a safe one.
Ready to Upgrade Your Entry Experience?
You’ve seen how simple it is to move from a basic mechanical remote to a fully integrated, intelligent system. Whether you start with a budget-friendly retrofit kit or invest in a quiet new motor, the result is a home that finally works for you. By expanding your setup to include motion-activated lighting and climate sensors, you transform a dark storage area into a responsive and secure hub.
Mastering garage smart home automation doesn’t have to be an overwhelming task. You now have the knowledge to boost your Wi-Fi signal, secure your entry with PIN-protected voice commands, and create routines that eliminate daily stress. We’ve performed the research to find the most reliable gear so you can make informed decisions with confidence. Start building your savvy nest with our curated Smart Home Buying Guide. Our resources provide expert-tested recommendations and beginner-friendly explanations with a no-jargon approach to tech. You’re just a few steps away from a more convenient lifestyle. Go ahead and take that first step today.
Common Questions About Garage Automation
Is garage smart home automation safe from hackers?
Modern garage smart home automation is highly secure when you use devices with rolling code technology. This feature ensures your access code changes every single time the door is used, which effectively prevents “code grabbing” by intruders. To maximize your safety, always enable Two-Factor Authentication on your apps and avoid using voice-open commands without a secondary PIN. These simple steps keep your digital entry points as locked down as your physical ones.
Will my smart garage door opener work if the Wi-Fi goes down?
Your garage door will still open and close using the traditional wall button and your standard car remotes even if the Wi-Fi fails. You only lose the “smart” functionality, like remote smartphone control and real-time alerts, until the internet connection returns. If you’re worried about spotty signals, look for controllers that offer local Bluetooth connectivity as a backup. This allows you to operate the door from your driveway without needing an active cloud connection.
Can I automate an old garage door opener without replacing it?
You don’t need to buy a new motor to enjoy garage smart home automation if your current opener was made after 1993. This was the year federal safety standard 16 CFR Part 1211 made photoelectric sensors mandatory. You can simply add a retrofit controller, like those from Meross or Tailwind, which wires into your existing motor in about 20 minutes. It’s a savvy, low-cost way to upgrade your space without the hassle of a full installation.
Does garage automation work with Alexa and Google Home?
Most reputable smart garage brands integrate perfectly with Amazon Alexa and Google Home. You can easily add your garage door to your existing “Goodnight” or “Away” routines to ensure the house is locked down with a single command. For safety, these platforms usually require you to set a verbal PIN for opening the door. This prevents someone from shouting a command through an open window to gain unauthorized access to your home.
What happens to my smart garage door during a power outage?
If the electricity cuts out, your smart opener will stop working unless you’ve chosen a model with a built-in battery backup. Without a battery, you’ll need to pull the manual release cord to lift the door by hand. Many integrated units now include these backups as a standard feature to ensure you aren’t stuck outside during a storm. It’s a small upgrade that provides massive peace of mind when the grid goes down.
Are smart garage door openers difficult to install for beginners?
Installing a retrofit smart sensor is a very approachable DIY project that takes most beginners less than 30 minutes. The process usually involves mounting a small sensor on the door and connecting two wires to the motor terminals. While replacing a full motor is more labor-intensive and may take a few hours, the app-based setup is designed to be intuitive. Most manufacturers provide clear video tutorials that guide you through every step of the connection process.